

So, you’ve noticed a bump. If you are looking for how to fix a piercing bump, you aren’t alone. Your new piercing is red, throbbing, and just won’t behave, so you do what everyone does: you Google it. Within minutes, you’re told to crush up aspirin or to buy essential oils.
Stop right there. Most complications arise from improper aftercare and low-quality materials. This guide breaks down the science of wound healing to debunk common piercing myths.
- The Medicine Cabinet "Cures"
- The Aspirin Paste Myth
- The Tea Tree Oil Trap
- The Polysporin/Ointment Problem
If you missed my guide on Piercing Aftercare, check that out for the stages of healing and how to clean your new piercing.
The Medicine Cabinet “Cures”

The Aspirin Paste Myth
The Science: Aspirin is acetylsalicylic acid. A medical case study published by the National Institutes of Health has documented that applying it directly to the skin can cause chemical burns. Therefore it “shrinks” the bump by killing tissue, which leads to permanent scarring rather than actual healing.
The Tea Tree Oil Trap
The Science: Tea tree oil is a strong, drying essential oil with antimicrobial activity in lab studies, but that strength is also the problem. Research from PubMed Central shows it can irritate skin and trigger allergic contact dermatitis, especially on damaged or healing tissue. On a healing piercing, this irritation can disrupt normal cell repair, increase inflammation, and make bumps harder to resolve rather than helping them heal.
The Polysporin/Ointment Problem
The Science: A randomized clinical study published in JAAD found that wounds treated without antibiotic ointments healed just as well, and sometimes better, than those treated with antibiotics. These products were also more likely to cause skin irritation or allergic reactions.
The Harm: Ointments are occlusive, meaning they seal the piercing channel and block airflow. Piercings heal from the inside out and need oxygen. Trapping moisture and bacteria can delay healing and lead to irritation bumps.
The “Bad Advice” Hall of Fame (2026 Edition)
The “Twist and Turn” Myth
One of the most persistent myths I still hear, especially from parents, is that you must “turn the jewelry so the skin doesn’t grow onto it.”
The Reality: Picking a wound stalls healing. So every time you twist, you rip the delicate new skin cells (the fistula).
The Truth: As long as you wear Titanium F-136, Surgical Steel, Glass (Borosilicate or Quartz), Niobium, or 14k or 18k Solid Gold your skin cannot “grow onto” it. That “stuck” feeling is just dried lymph fluid; simply spray it with 0.9% sterile saline solution to dissolve the “glue.” Never rotate the jewelry. It will move on it’s own when it’s ready.
The “Pop the Bump” Mistake
It might look like a pimple, but a piercing bump is not acne.
The Truth: If you pop it, you are creating an open wound on top of an already irritated one. This introduces bacteria from your fingernails or tool into the wound and usually makes the bump grow back twice as large due to the trauma.
Taking Jewelry Out if Infected
If your piercing is hot, leaking green fluid, and throbbing, you might think taking it out will help it heal.
The Truth: The jewelry acts as a “drain.” If you pull it out, the skin can close up, trapping the infection inside your body and leading to a serious abscess. Keep the jewelry in and see a doctor for antibiotics immediately, they then will let you know if you can keep it or remove it once safe to do so.
Switching to a Hoop Too Soon (Cheese-Wire Effect)

People often want to put a ring in as soon as their piercing isn’t sore. Then they have soreness or see a bump a few weeks later.
The Truth: Rings move, slide, and rotate, dragging bacteria into the wound. The curve of a ring also puts uneven pressure on the hole. If you have a bump or its not a fully healed piercing, a straight, implant-grade barbell is the way to calm it down.
The No-Pull Disk Debate
The Benefit: These silicone disks act as a “splint.” If your jewelry is tilting or sinking, the disk adds stability and stops the movement that causes bumps.
The Catch: Often, they work simply because they take up extra space on a bar that is too long. A properly downsized post usually achieves the same result without the extra bulk.
The Risk: They can be moisture traps. Because they sit flush against the skin, they trap sweat and bacteria, which can lead to a “mushy” irritation bump if the area isn’t kept super dry.
The Verdict: Helpful for stabilizing “sinking” piercings, but usually a temporary fix. Check your jewelry style and length first!
The Soap Debate
Even gentle, fragrance-free soap can be a problem if it isn’t rinsed off properly.
The Risk: Soap residue trapped behind jewelry is a major cause of irritation. If you use soap, you must rinse all the soap and residue away. In 2026, many pros suggest sticking to 0.9% sterile saline solution to avoid this irritation entirely.
How to Use Saline Wound Wash to Clean a Piercing
The Mist: Spray a 2-second mist directly onto the piercing. This softens the debris.
The Wait: Let it sit for a minute (or do this in the shower). This “soak” time does 90% of the work.
The Q-Tip Debate: The APP warns that fluffy cotton fibers can get caught in the wound. If you must use a swab, saturate it with saline first so it doesn’t shed. Gently dab away softened debris; never scrub. If available woven gauze should be used.
The Crucial Step (DRY IT): Leaving a piercing wet causes Moisture Bumps. Use a clean paper towel to pat dry around and under the piercing or a hair dryer on the COOL and LOW setting for 30 seconds to ensure the area is completely dry.
“It’s a Keloid!” (The Mystery of the Bump)

The word keloid is often misused. According to the American Osteopathic College of Dermatology, Keloids are raised, reddish or skin tone nodules that develop at the site of an injury. They are rare and usually genetic. They grow beyond the original wound and do not come and go. If you have a small, localized red bump around a piercing, it’s far more likely an irritation bump.
Common causes:
- Angle: Even a slight tilt puts constant pressure on the tissue.
- Moisture pockets: Not fully drying the area after cleaning.
- Products: Hairspray, dry shampoo, makeup, and face oils can trap moisture and bacteria.
- Jewelry style: Too long, too short, material, gauge, or overly heavy jewelry can irritate the tissue.
- Pressure from external objects: Headphones, hats, or sleeping on the piercing can create constant friction.
What to do:
If a bump develops, contact your piercer to assess the root cause and check that the jewelry and placement are correct. Gentle care can help reduce irritation: warm 0.9% sterile saline solution soaks for 3–5 minutes, twice daily can clean the area, increase blood flow, and support healing. After soaking, dry completely and avoid touching or applying products. Addressing the root cause with your piercer is key to preventing further irritation.
The Metal Science: What is Actually Safe?
| Material | Safety Rating | Authority Standards |
| Implant-Grade Titanium | ⭐⭐⭐⭐⭐ | ASTM F-136 certified; Nickel-free. |
| Implant-Grade Steel | ⭐⭐⭐⭐⭐ | ASTM F-138 certified; Must be Internally Threaded. |
| Niobium (99.9% Pure) | ⭐⭐⭐⭐⭐ | Best for those with extreme metal allergies. |
| Solid 14k/18k Gold | ⭐⭐⭐⭐ | Must be Solid (not plated) and Nickel-free. |
| Sterling Silver Of Any Kind | ❌ Avoid – Not approved for healing or long-term wear. | Causes Argyria (permanent grey/black skin staining). |
The Gold Standard vs. The Gold Trap
If you choose gold, it must be Solid 14k or 18k gold.
Avoid Gold Plated or Gold Filled: These have a thin layer of gold over a base metal like copper or brass. Over time, the gold wears off, and the base metal reacts with your body, causing green/black skin and massive irritation.
The 925 Sterling Silver Trap:
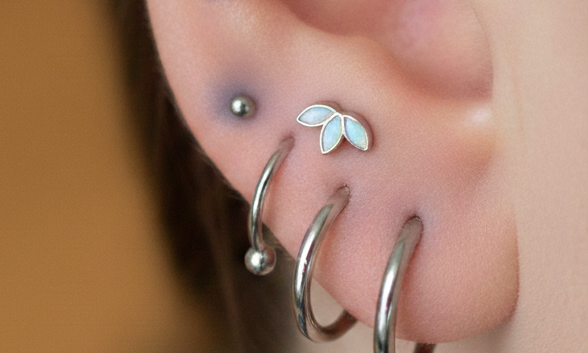
Sterling silver reacts with body fluids, forming silver salts that can deposit in the skin. This may leave a permanent blue-grey or black stain, even on healed piercings. To avoid staining, choose metals like titanium or surgical steel instead of silver for all piercings.
Conclusion: How to Fix a Piercing Bump for Good
The secret to a healthy piercing isn’t a “magic product” it’s patience and high-quality materials. Stick to 0.9% sterile saline solution, stop twisting your jewelry, and let your body do its job. Once the root cause is addressed, you’ll finally know how to fix a piercing bump for good, as they usually shrink on their own with consistent care. However, if things aren’t improving, don’t hesitate to contact myself or your piercer for a professional assessment. They can check your jewelry angles and fit in person to get you back on track.
Before you go, use this checklist to troubleshoot your mystery bump:
The Ultimate Piercing Troubleshooting Checklist
The Hands-Off Check: Are you “crusty hunting” with your fingernails or twisting the jewelry?Every time you move it, you tear the delicate new skin forming inside. LITHA: Leave It The Hell Alone!
The Metal Check: Is your jewelry Implant-Grade Titanium or 316L Surgical Steel ? If it’s mystery “steel” or sterling silver, your body might be reacting to nickel. Switching to titanium is often the “instant fix.” (or if your the rare person who is allergic to titanium we switch to steel)
The Fit & Movement Check: Too Long: Has initial swelling reduced and the bar slide back and forth? Friction causes bumps. You likely need a downsize.
The Shape: Are you wearing a hoop? The constant rotation of a ring drags bacteria into the wound. Swap to a flat-back stud until the bump is gone. (unless it is a piercing that is meant to have a ring like a septum or daith)
The Moisture Check: Are you leaving the piercing wet after your shower or saline spray? Moisture is a leading cause of “mushy” bumps. Tip: Use a hair dryer on the COOL setting for 30 seconds to ensure the area is really dry.
The Pressure Check: Are you sleeping on that side? Even if it doesn’t hurt, the pressure tilts the jewelry. Pro-tip: Use a travel pillow and put your ear in the hole so the piercing never touches the fabric.
Have you ever had a stubborn piercing bump? Share your experience in the comments below I’d love to hear what worked (or didn’t) for you!